Wednesday, January 29, 2014

1958 ~ Mom, Dad & Me

Vintage or shabby, or a little of both...
Not sure what style you would categorize this scrapbook layout I created.

My son posted on Facebook family photos of mine that I had forgotten all about
I had assumed all those pics were still neatly and safely tucked away in a box!
He has acquired quite a few of those older family photos, or shall I say snatched them up while I wasn't looking!!

Anyhow...I decided to print some of those forgotten photos and scrapbook them. 
Then I recently found a bargain on Tim Holtz French Industrial 12x12 Paper Stash and could not pass it up. 

This paper collection has ornate writings, vintage ephemera, European imagery, old photographs and a touch of steam punk! 
The nostalgic color palette is perfect for the distressed vintage, or the shabby look. 

This French Industrial Collection is some what out of my comfort zone but I am always challenging myself and thought they were perfect for this photo taken in 1958 of my mother & father and me. 

vintage scrapbooking layout


While I was distressing the paper, I did a boo boo, making a larger tear than I had in mind, so I just went with it and made a couple more!
The clock was fussy cut from Authentique Cherish Collection
All the paper edges, photo and embellishments were inked with Vintage Photo Distress Ink.


The flowers and crocheted doily are from Prima Madeline Love Note Collection and were topped off  with a Tim Holtz Idea-ology button
I found the ivory battenburg lace doily in my mother's sewing stash (after she passed away)


I dyed seam binding with strong coffee then created a multi loop bow and finished it with a Graphic 45 metal brad
The wood veneer embellishment is from Studio Calico. and I attached a metal heart key from my stash and a Tim Holtz chain tassel.
I used a Distress Marker in black soot for the pointing finger/hand from Tim Holtz Visual Artistry GRUNGE CIRQUE Cling Stamp Set 


So, what do you think....is it vintage, shabby or both?


TTFN !

HAPPY CRAFTING.....


aka, The Rebel Blogger

Saturday, January 25, 2014

Large Desk Organizer

Hope everyone is keeping warm and cozy.
I have my long, soft robe on over my clothes. I'm also thinking about putting another pair of socks on!!


This desk organizer I created is quite different and larger than the one I made here > Desk Organizer ~ Book Box Style.

This was a Christmas gift to my son Carl, so of course no frills and flowers and lace!

He tends to be a little on the OCD side when it comes to organization, which is good!
He knows where everything is because it all has it's own place. 
I will take blame for that inherited trait!
All though more and more lately, the darn fatigue is really getting in the way of my organizational skills and more :( 

I fell in love with this paper collection by DCWV - The Guy Stack, mustaches and ties...oh yea!! 
It was pure coincidence I used the same paper collection for my > Coupon Organizer with Note Pad....you can't tell the papers are from the same stack!


chipboard desk organizer
Front View


Top View


Back View


DCWV Adhesive Cork added for a little detailing!


The tutorial is by maggiemylow on YouTube.
She does an excellent job and you can easily follow her, each and every step of the way.


I just had a thought....maybe I can convince Carl to organize my craft space, thus make more room to allow for more goodies!!


Till next time...Happy Crafting!
TTFN!


aka, The Rebel Blogger

Monday, January 20, 2014

The Rebel Blogger With A Recipe!

Well, Cindy's Paper Creation is 1 year old! 
According to my stats...it's not good, in fact, I am not liked at all  :(
And I have no one to blame but MOI !!


I have broken all the rules...
I'm thinking maybe I should change my title to 
' The Rebel Blogger ' ! 

They say - blog quantity -
I don't post daily, I wear at least a couple other hats during the day!
To become a daily blogger, would mean also finding the time and energy level to create, because I enjoy and savor the time spent while in the creative process!

They say - blog quality -

What really is quality? 
Every blogger and reader has their own perception of quality.

They say - pick a niche and stick with that niche only -

I say I have more than one niche that I definitely will share.
I wish to write a personal thought/journal here also, done it!

And I certainly don't want to add another blog or two. More stress, goodness gracious !! 

Maybe, just maybe, if I followed through with their every advice and then some.

Plus I don't own a die cut machine for all those wonderful metal dies. I don't own a Silhouette. I don't own a ton of stamps and inks. I don't own Copics or Spectrum Noirs and the list could go on!
I did get the opportunity many years ago to purchase a Cricut and have accrued 10 cartridges. 

My point being, I don't have the resources to make my creative process smoother or the variety broader... but I think I do quite alright with what I have obtained!

And guess what...
I am perfectly happy being 'The Rebel Blogger' for right now!!


~~~~~~~~~~~~~~~~~~~~~~~~~~~~~~~~~~~~~~~~~~~~~~~~~~~~~~~~~~~~~~~~~~~~


So, since I got that off my chest, I am going to share one of my other loves.... 

Baking!


My sweet tooth goes into overtime at the sight of fresh baked goodies!


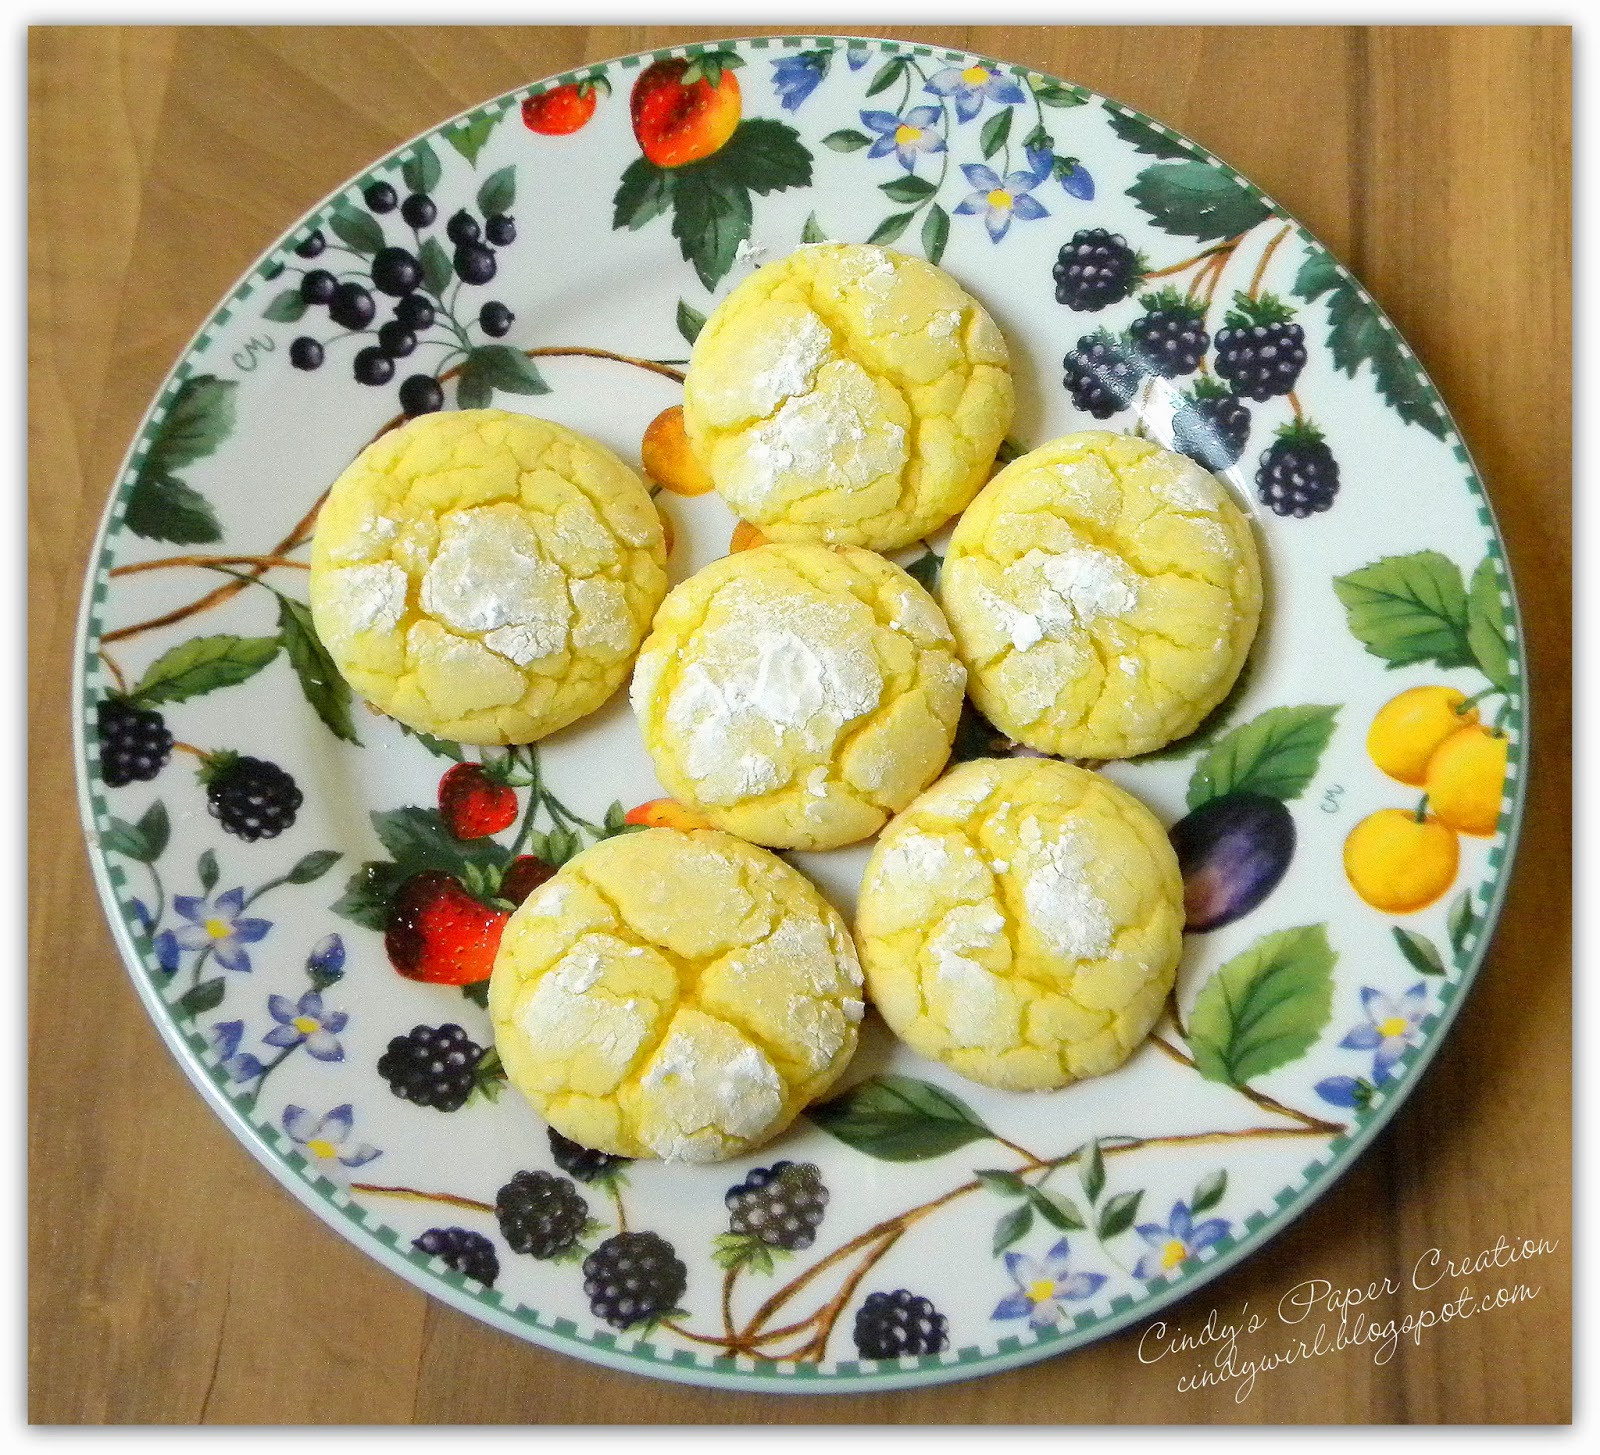
I so appreciate and savor every bite of a good cookie. This lemony cookie puts a delicious twist on basic cake mix.

As much as I love making homemade cookies from scratch, this is my ultimate go-to, easiest lemon cookie recipe.They are super fast to throw together, and quick to bake! 


Tom's favorite flavor is chocolate, so for the holidays I had been baking with chocolate quite a bit. Don't get me wrong, I absolutely am in love with chocolate too!

But since the sun has been sparse lately, I felt we needed to add a little sunshine to brighten our cold and dreary days.
Oh my gosh...these cookies really shine with their vibrant presence and aroma. They remind me of summertime, light and refreshing.

Sweet joy...I am in heaven!!  


Lemon Crinkle Cookie Recipe


These cookies definitely satisfy the sweet tooth in me. Just the perfect touch of sweetness when I get to craving lemony desserts. 
They have a soft interior texture and a slightly crisp exterior, similar to that of a snicker doodle.
These cookies are so tasty, I actually inhaled 4 cookies before they had the chance to cool completely! I am blown away by their texture and zesty flavor! 


EASY CRINKLE LEMON COOKIES 

Preheat oven to 375 degrees F ( 190 degrees C ). 
Yields approximately 36 cookies

INGREDIENTS:


      1 (18.25 ounce) package lemon cake mix

      2 eggs
      1/3 cup canola oil
      1 teaspoon lemon extract
      1/3 cup confections' sugar 

DIRECTIONS: 

  1. Pour cake mix into a large bowl. Stir in eggs, oil, and lemon extract until well blended.
  2. Form dough into 1 inch balls.
  3. Roll the balls into the confectioners' sugar then place 2 inches apart on sheet pans.
  4. Bake for 6 to 9 minutes or until the bottoms of the cookies just begin to turn a light golden. 
  5. Remove from oven and allow to cool for a minute or two before transferring to a wire rack.

Why not give them a try!

I guarantee they won't last long in your home  :-)

Enjoy!!


Till next time...

TTFN !


aka, The Rebel Blogger

Thursday, January 16, 2014

Coupon Organizer with Note Pad

Ask and you shall receive...I was on a mission!

My daughter Christina (aka Chrissy!) had recently started couponing and needed an organizer. She asked if I could make her something to hold the coupons. 

This organizers' convenient size makes an easy fit for almost any purse. 

We girls all know how purses can be.
Some of us have the habit of filling them to the brim and eventually all smaller items end up at the bottom! 
Then to look for what we need, we push and shove, move stuff this way and that! 
Pretty soon stuff is thrown around, inside and outside of our purses!!
I guess I shouldn't call it STUFF, because we all know it is NOT stuff! 
EVERYTHING in our purse is vital and essential for day to day living! Right girls?

Henceforth, the organizer was not embellished and decorated for assuredly they would of gotten damaged or worse, fallen off. 

The YouTube tutorial for this fun project came from

Laura Denison's ~ Follow The Paper Trail
She is another one of the many amazing paper crafters I love!

The paper collection used is DCWV ~ The Guy Stack. 
Chrissy is not a girlie girl so I thought this was a perfect choice for her! Her favorite color is purple, but I did not have enough of a pattern variety in heavier paper.

Guess what I just put on my want list? Good gracious...that list is getting longer by the day!!


chipboard coupon organizer
   You can not see but this paper collection has texture and shine!


 I incorporated tyvek in between the two papers of  the closure tab to help with durability.

 The organizer opens and closes easily with Velcro's low profile fastener.


    This paper pad is from Dollar General, $1.00 cheap to refill!!


Kinda plain looking for me, but it is what it is...an organizer that was well received and will serve it's purpose! 


Till next time...Happy Crafting!


TTFN!


aka The Rebel Blogger

Sunday, January 12, 2014

New York City Excursion

A short prologue:

I had just found out about my thyroid cancer shortly before taking a bus trip in 2011 to New York City.
The first consultation appointment was made at Cleveland Clinic with a specialist but I had not seen anyone yet. I did not know the extent or involvement at this time. All the very important details were unknown. 
So, needless to say, I owned a mysterious and burdensome dark shadow over me during this excursion.  

In a previous post on Nov 15, 2013, I mentioned epic emotions. I had experienced a few during this trip. I would like to share a couple of those moments with you...


While I was sitting on the bus beside my then 80 yr. old father, I remember watching him breath as he slept. 
How he must feel to have lived such a long blessed life! Then I got to wondering, will I live a long blessed life just like he has?

(By the way, I'm thinkin he looks pretty darn good for his age!!)


New York City Lights


I also remember amazingly gazing at all the sights and lights of the city, trying to soak it ALL up!
I wanted so desperately to keep every bit of detail of the city in my memory, forever and ever!


Onward...


These are some what better camera shots of a couple of the layouts I created from that trip...


I fussy cut the chalkboard paper and stars. Don't know the name of the paper, as it was given to me by my niece, Shawna, along with a box full of other scrapbooking goodies! Shawna has got some artistic talent of her own but I'll leave that for another post!
The title was cut from Martha Stewart Alphabet punches. I added actual ticket stubs! Pink Paislee Artisan Chipboard arrows were added also. 

I like the stitching around the border. I need to make use of my sewing machine more often!


Next...


I love the puffy gold star banner and the 12x12 paper, die cut to look like a stamp! And of course you know me, can't remember any of the ingredients. I do know the border punch is from Martha Stewart.


I cannot get the hang of taking photos of scrapbooking pages. 
I have tried and tried to get photos of some of my older layouts to look half ways decent and at least presentable. 
They look all warped and cockeyed! Plus the lighting is not even around the whole layout. 
I am definitely doing something wrong, GRRR!!

Well,that's another story from my heart for now.
Hope you will come back soon to visit me again! 


Happy Crafting!
TTFN!


aka The Rebel Blogger

Tuesday, January 7, 2014

Recipe Organizer ~ Kathy Orta Files & Graphic 45 French Country

Awhile back in a previous post, I mentioned that I was working on a recipe organizer for my sister for Christmas.
Well, I finally finished it in early December! 

It was a huge project and something different for me to tackle!
I took my time, thinking each process thoroughly. 
I had to stop a couple of times and search/order more paper, embellishments, a ring binder, etc.
But the end result was well worth it! 

I purchased the tutorial from Paper Phenomenon - Kathy Orta Files
She makes her tutorials easy to follow (esp. for beginners like me) and includes pictures. Thanks Kathy!! 
I could not enter this into her Contest due to one of her rules was to make a video of your project and I don't do videos. 
I tried to get my granddaughter to make a video before it made the trip to Florida, but it never happened!
I am hoping that someday my recipe organizer will make it to one of Kathy's Inspiration Monday posts!


And now without further ado, TADA!!.....


Recipe Organizer Kathy Orta Files
The rooster and sunflowers were fussy cut from the Graphic 45 French Country Collection

Easel style lid to easily hold recipes! When not in use, the lid stays closed with the help of a magnet.


Rooster charm ~ Etsy

Lid & drawer knobs ~ Tim Holtz 


Chipboard embellishment ~ Graphic 45 French Country

Metal brads ~ Graphic 45


Recipe dividers & trim ~ Cricut cartridge, "Just Because" Cards

The binder (see below) fits in the left side.


I searched and searched for recipe cards with roosters on them. I finally found just the right ones at an Amish bakery/gift shop while on a mini vacation during the summer!


Recipe binder ~ front view


Recipe binder ~inside view


Recipe binder dividers hold recipes/coupons in place, then can be incorporated to a recipe card if so desired.


Inside binder ~ left pocket 

Inside binder ~ right pocket

I left the recipe card dividers and the binder dividers blank. That way Tracy can personalize the categories to her liking!

I am (bashfully) proud of this project and so glad I challenged myself!

Hope you will allow some time in your week to create. 


Till next time...
Happy Crafting!

TTFN!


aka The Rebel Blogger

Saturday, January 4, 2014

My Tiny Craft Space

Welcome 2014! Did you make a New Years resolution?
No resolutions for me, I can't keep them!

With all the new and exciting products out there, it is difficult to keep my supplies to a minimum because of limited space.
So,  with that being said, I thought I would share my tiny crafting space, and yes, I said SPACE!! I do not have a whole room for crafting.

Our home is small, but quite cozy. Only one bedroom on the main level. The second floor is one whole room, which used to be my daughters bedroom years ago. The ceiling slants half way on both sides, which makes it impossible to hang anything.

My crafting space and computer desk is on one side of the room, the other side does have a small desk that my sewing machine sits on. The rest of the room is occupied with stuff.  
Someday I would like to move to the basement, but it is used as a weight room for hubby! I guess he needs his space too!  ;) 

                               ~~~~~~~~~~~~~~~~~~~~
Please be aware that I have been having tons of fun creating lately and my space is a total disaster!! When the mojo kicks in, I go and go, can't stop to take the time to clean!! I am usually working on 2-3 projects at a time. 

I can assure you, the rest of my home is in some type of order...nothing nearly this messy! 


So here I am.....

a tiny craft space
At least my 15 year old cat, Chloe doesn't mind the constructive clutter!
She takes over my computer chair, will not move for nothing! I have to sit at the very end of the seat!


Those colorful scissors...one of my first buys, many years ago. I just can't seem to part with them!


Not all this stuff (in my space! LOL) is just mine. See the box and packing styrofoam.


Scrapes of tiny paper everywhere on the floor, even found some downstairs!


Currently, the actual work area looks to be about 12 inches, if I push some things to the side!
I still can see some space to create!!


Believe it or not, my space was clean and organized around 3 weeks ago! 

I should of taken photos then but it would of been boring, don't you agree?

~~~~~~~~~~~~~~~~~~~~~~~~~~

Here is my dream room....

Craft room

I would have no problems making this work! 

Hey...a girl can dream, right?


Happy Crafting!  
TTFN


aka The Rebel Blogger

Cindy's Paper Creation Popular Posts That Might Interest You